
Creating homemade soaps using the cold process method is a growing hobby. Being able to make soaps with oils of our choice and decorate them according to our tastes, makes their creation irresistible. Among the most beautiful decorations to admire and reproduce is the swirl technique. This technique allows you to create beautiful colorful patterns through the alternation of masses of soap of different colors. But, although, the final result is fantastic to see, is not always easy to achieve it after the first attempt. In this article, I want to show you how to make swirl in cold process soap with wrong formulation. This means how to save the project even when the soap mass has reached a thick trace.
Disclosure: Some of the links in this post are affiliate links. By clicking through them and making a purchase, I may receive a small commission WITHOUT any additional cost to you.
Gabi
Homemade soap: The course
Before putting into practice the technique of the swirl it is necessary to know very well how to prepare a soap and all the phases that characterize it.
In addition, it is important to be aware of how the choice of oils and butters can influence not only the phases of the production process but also the final characteristics of the soap itself. Precisely, to help you clarify any doubts about saponification, I have created a course dedicated to cold saponification where every aspect is analyzed and explained. In the course, you will be guided step by step through the entire process of cold method so that you can finally create your own soaps according to your needs, without having to rely on tutorials and thus become more eco-sustainable and an ally of the environment. Check it out here!

How to make Swirl in Cold Process Soap
The swirl technique is a very popular decoration technique and it is certainly the one that most attracts our attention when we search for inspiration. On Pinterest, for example, there are many images of soaps decorated with this technique. If you also use Pinterest to find inspiration, I’m sure you’ve saved a pin of a soap with swirl decorations. To decorate a soap with the swirl technique, you have to pay close attention to the formulation and the trace point.
Swirl soap technique: Controlling Trace in Cold Process Soap Making
For swirl technique, reaching the trace is a step to be followed very carefully. The trace is the point in the reaction where the emulsion between the oils and the caustic soda solution is reached.
Once oil has been transformed into soap it is impossible to go back, as the reaction is irreversible. It is therefore important to formulate our soap in such a way as to avoid overly dense traces and be careful to stop mixing ingredients at the exact moment.
Unfortunately, describing this step is complicated and only experience can help us to recognize the exact point in which to stop. This article just wants to show you what to do when you have reached a trace too thick but still want to decorate soaps with the technique of swirl.

Swirl Soap Technique and Formulation
One way to avoid a thick trace is to carefully choose the oils and butters to use in the formula. To create smooth, even color swirls we need to formulate our soap avoiding butters or oils that reach the thick trace quickly. Using high percentages of shea butter or cocoa butter will accelerate the reaching of the trace in a very sudden way, preventing the obtaining of a soap mass of the right fluidity. To avoid that the mass of soap becomes very thick quickly is better to use in the formulation oils such as sunflower oil, sweet almonds or olive oil that need a little more time to reach the trace.
These will allow us to work with a more fluid mass of soap (light trace) and thus have time to create our soaps with the swirl technique.
How to save a project and decorate soaps with the technique of swirl
In this article, I do not want to show you how to create a perfect soap but I want to show you how it is possible to make cold process soaps with the swirl technique even when the mass is too thick.
Even with years of experience in soapmaking, it can happen that we don’t get the desired result for the swirl. For example, we may get distracted and mix the ingredients more than we should, resulting in a trace that is too thick. Or, we could pour the caustic soda solution at high temperature causing the acceleration of the saponification reaction and the sudden passing of the trace. Whatever the cause, let’s see how to get around this problem and how to decorate our soaps with the swirl technique.

Recipe: How to make Swirl in Cold Process Soap
For the purpose of this article, I intentionally decided to create a soap with a formulation that is not perfect for the swirl technique. As mentioned in the previous paragraph, using large amounts of butters in the formulation would speed up the swirl by quickly resulting in an overly thick mass of soap. This was exactly my goal. To create a soap that would quickly reach a thick trace.
The ingredients used were:
- 12% (18 g / 0.63Oz) avocado oil (you can find it here)
- 20% (30 g / 1.06Oz) cocoa butter (You can find it here or on Dragonspice)
- 25% (37.5 g / 1.32Oz) olive oil (you can find it here)
- 20% (30 g / 1.06Oz) mango butter (you can find it here)
- 20% (30 g / 1.06Oz) coconut oil (you can find it here)
- 3% (4.5 g / 0.16Oz) castor oil (you can find it here)
- 20.04 g / 0.7Oz Lye (you can find it here)
- 57 g / 2.01Oz distilled water (you can find it here)
- Colored pigments (an example here)
While the main tools used to make the homemade soaps were:
- protective goggles (you can find them here)
- glass rod (you can find it here)
- protective gloves (find them here)
- protective mask (find it here)
- silicone molds (you can find them here)
- hand blender (you can find it here)
- wooden stick
As you can see from the recipe, the formulation includes a large amount of butters in order to reach the trace quickly.
Additional Info
Of course you can use this recipe for your soaps even if you don’t want to decorate them with the swirl technique. With this recipe your soaps will have:
- excellent cleaning and emollient properties.
- You won’t have to mix the ingredients for a long time because the trace will soon be achieved.
- Also, you won’t have to wait for long months of curing because they will be ready for use after only a few weeks.
As with any of my articles related to cold soap making, I recommend you check out my article “What they don’t tell you about homemade soap“. In this post, I’ve collected all the mistakes made in the first few months of soap making. This post will be useful to avoid potential critical situations thanks to the implementation of some simple tricks.
Tutorial
Procedure
To make the soap, I weighed the fats and heated them in a bain-marie to melt them. In the meantime, I weighed caustic soda and poured it into the water (NEVER THE CONTRARY!!). Then I stirred until it was completely dissolved.
The preparation of caustic soda is an important step. It can also be dangerous, if not done with the right precautions. I suggest you to have a look at my mini-course entirely dedicated to this aspect. In my mini-course, you will find the main recommendations and advices to help you properly handle lye. Also, a simple tutorial to show you in practice how to make a simple bar of soap. You can find it here.
When the caustic soda and the fats had both reached 45°C (113°F), I poured the caustic soda solution into the fats and mixed with an immersion blender. The trace was achieved very quickly as hoped. Now, I divided the soap mass into three parts and added two teaspoons of colored pigment into each of them. I mixed until a uniform colored mass was achieved.

Decorating Soaps with the Swirl Technique
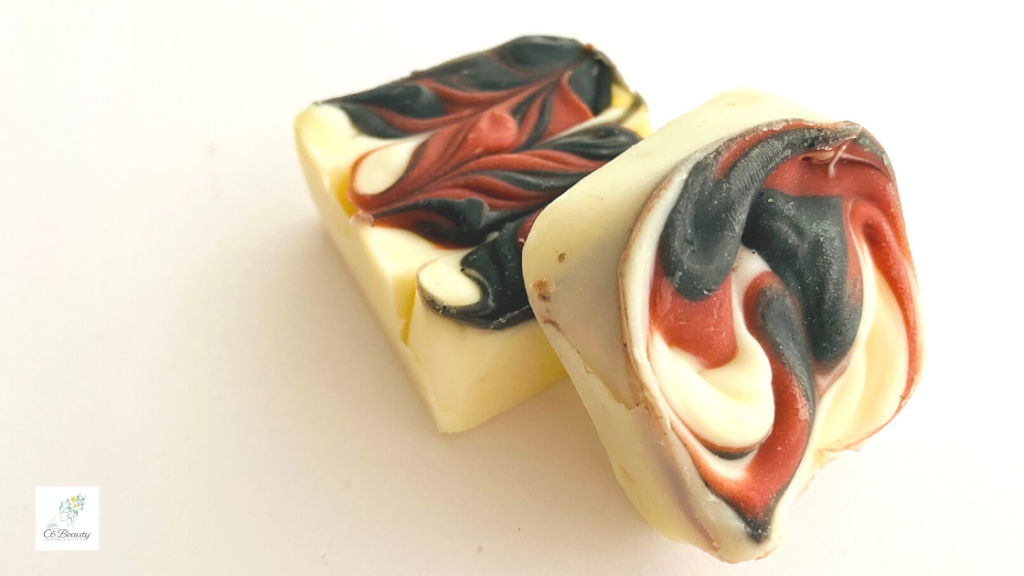
As the mass is too thick, it is impossible to pour it into the mold and create smooth and homogeneous patterns. To decorate soaps with the swirl technique let’s help ourselves with a spoon and a wooden stick. With the spoon, we are gonna pour into the mold alternate layers of colored soap, then we are gonna give it a movement using a wooden stick. The decorations won’t be perfect but we will have saved the project and decorated our soaps with the swirl technique.

After 4 weeks I pulled out the soaps and here they are! Decorated with the swirl technique despite a mass of soap too thick!

Beautiful aren’t they? If you try to make your own soaps with the swirl technique send me your creations! I’m really curious to see them!
Ready to make your first soap with my FREE guide to making soap?
If you like my content, help me with a small donation. With your support, I would like to buy new ingredients and create original healthy beauty products! Thank you 🙂
Gabi